

The formation block puts both starting elevens on a field, in shirts, with squad numbers, goals, cards, substitutions and an optional rating on each player. You build it by dragging players onto a grid in the game editor.
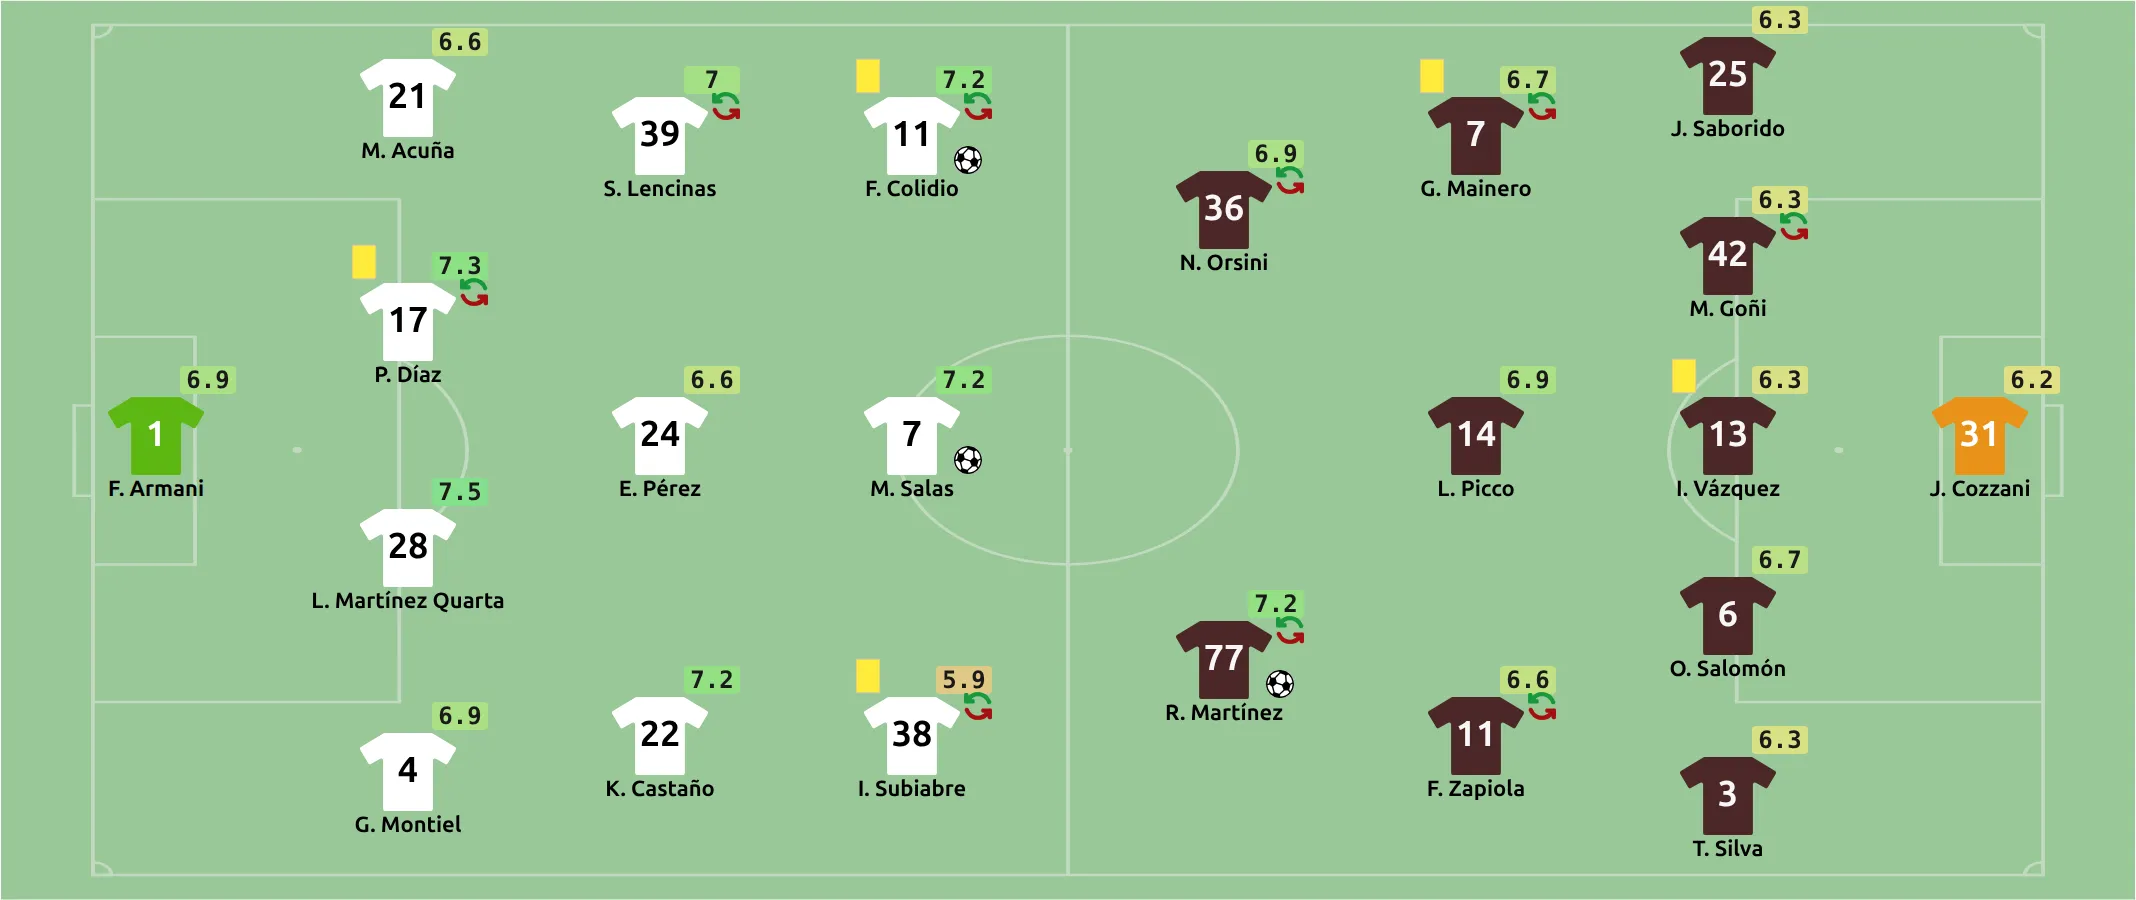
Fill in the lineups first
The pool of draggable players on the Formations tab is built from the starting eleven plus the substitutes on the Lineups tab. An empty Lineups tab leaves only the empty placeholder in the pool.
🚀 1. Build the formation
- Open the game and fill in the Lineups tab – starting eleven and substitutes, for both clubs.
- Switch to the Formations tab. Each club gets its own field, with an Available Players row above it.
- Drag players from that row onto the field. There are six columns per team and you set them up left to right, so the goalkeeper goes in the first column and the strikers in the last one you use. You do not have to use all six.
- Repeat for the second club and press Save.
Dragging copies rather than moves, so the pool never empties. A player already placed goes gray in the pool, which is how you spot who is left. To take someone off the field, use the red button on their card.
The empty placeholder
The first card in the pool is not a player – it reads – empty placeholder –. Drop it into a column to reserve a slot that stays blank. That is how you build shapes that are not symmetrical: a column of three where the middle one is empty gives you a proper diamond instead of an evenly spread line.
You can drop the placeholder as many times as you need, and it never grays out. Players do gray out once placed, but nothing stops you dropping the same one twice – check the field before you save.
👕 2. Choose the kit
Still on the Formations tab, above each field, is Home Club Shirt in Formation (and the away equivalent). It decides what the shirts look like for this game only:
| Option | Result |
|---|---|
| default | The club’s own kit, set up once in the club editor. See step 3. |
| custom colors | Four color pickers appear right below – shirt and number for field players, shirt and number for the goalkeeper. Set both colors of a pair, or that pair is ignored: a half-filled field-player pair gives plain shirts in the club’s main color, and a half-filled goalkeeper pair leaves the keeper gray. |
| in main club color | Plain shirts in the club’s main color. |
| home kit (from Club >> Club Shirt) | Force the home kit, even for the away side. |
| away kit (from Club >> Club Shirt) | Put the home side in its away kit – the fix for a color clash. On the away side it changes nothing, because the away side already wears its away kit. |
| colors from API Import | Whatever colors the provider sent with the game. Only useful on imported games – on a game with no imported colors, players and goalkeeper all wear the club’s main color. |
3. Set up a club’s kit once
Open the club and go to the Club Shirt tab. Home and away each get an SVG Code box plus three color pickers:
| Field | What it does |
|---|---|
| SVG Code | Your own shirt drawing – stripes, hoops, a sash. When it’s filled in, Solid is ignored for that side. |
| Solid | A plain shirt in one color. Used only when SVG Code is empty. |
| Number | The color of the squad number printed on the shirt. |
| Stroke | A thin outline around the number. Pick it when the number sits on a busy or light shirt and gets lost. |
The simple route is to skip the SVG and just set Solid. You get a plain shirt in that color, which is enough for most sites. The SVG box is there when you want the real kit.
Create a custom SVG shirt in 5 minutes
This short video builds a custom shirt in Figma. It was recorded on the old club editor – the code now goes into the SVG Code box on the Club Shirt tab – but the drawing and export steps haven’t changed.
Start from one of the two prepared templates instead of a blank canvas. Right-click the link and choose Save link as:
- empty_shirt.svg – a plain white shirt outline to draw on.
- shirt_a.svg – the same outline with dark red side panels and a center stripe, ready to recolor.


- Open the template in a vector editor. Figma is free and runs in the browser; Inkscape and Illustrator work too.
- Draw the stripes, hoops or panels as filled shapes on top of the outline, and give every shape its own fill color.
- Export the whole frame as SVG, open the file in a text editor, and copy everything from
<svgto</svg>. - Paste it into the SVG Code box for home or away, set Number (and Stroke if needed), and press Save.
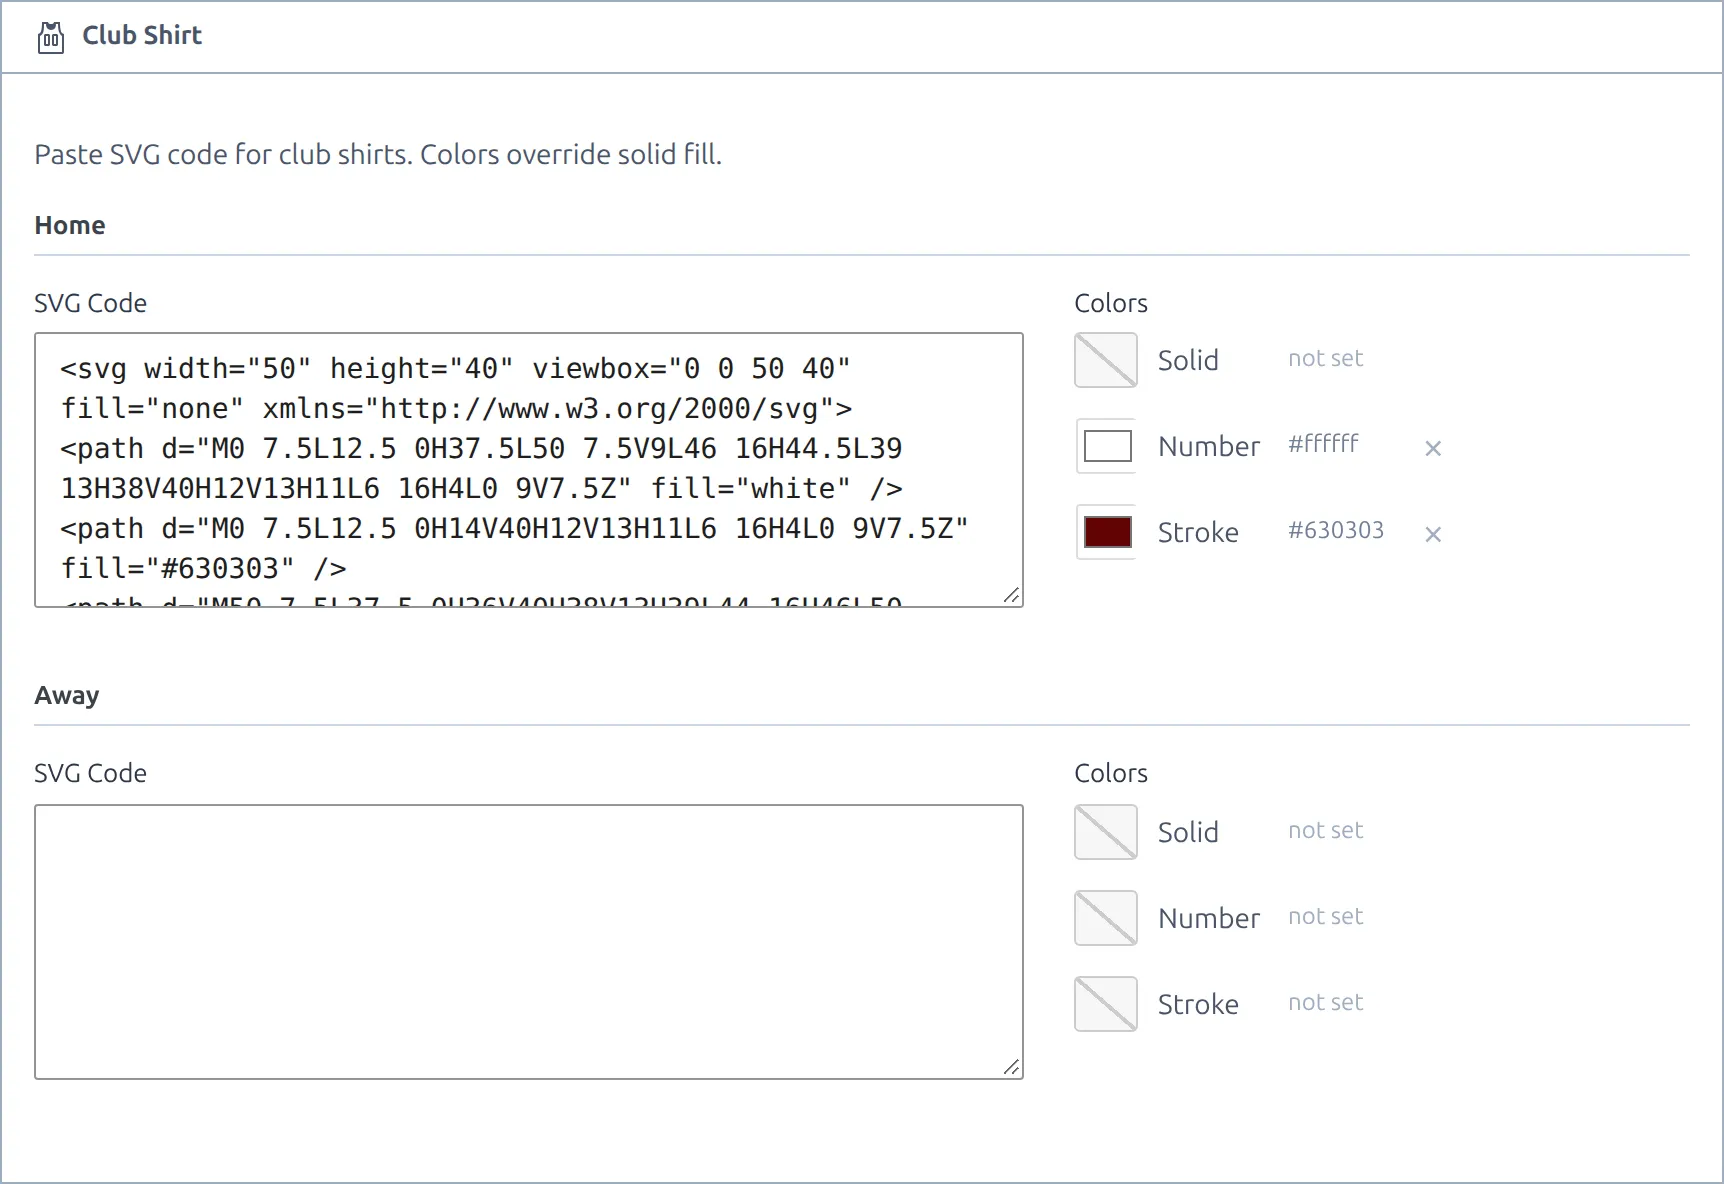
That’s the whole shirt_a.svg template. One white path is the shirt, two paths are the side panels, and one rectangle is the center stripe. Change the three #630303 values to your club color and you have a striped kit:
<svg width="50" height="40" viewBox="0 0 50 40" fill="none" xmlns="http://www.w3.org/2000/svg">
<path d="M0 7.5L12.5 0H37.5L50 7.5V9L46 16H44.5L39 13H38V40H12V13H11L6 16H4L0 9V7.5Z" fill="white"/>
<path d="M0 7.5L12.5 0H14V40H12V13H11L6 16H4L0 9V7.5Z" fill="#630303"/>
<path d="M50 7.5L37.5 0H36V40H38V13H39L44 16H46L50 9V7.5Z" fill="#630303"/>
<rect x="19" width="12" height="40" fill="#630303"/>
</svg>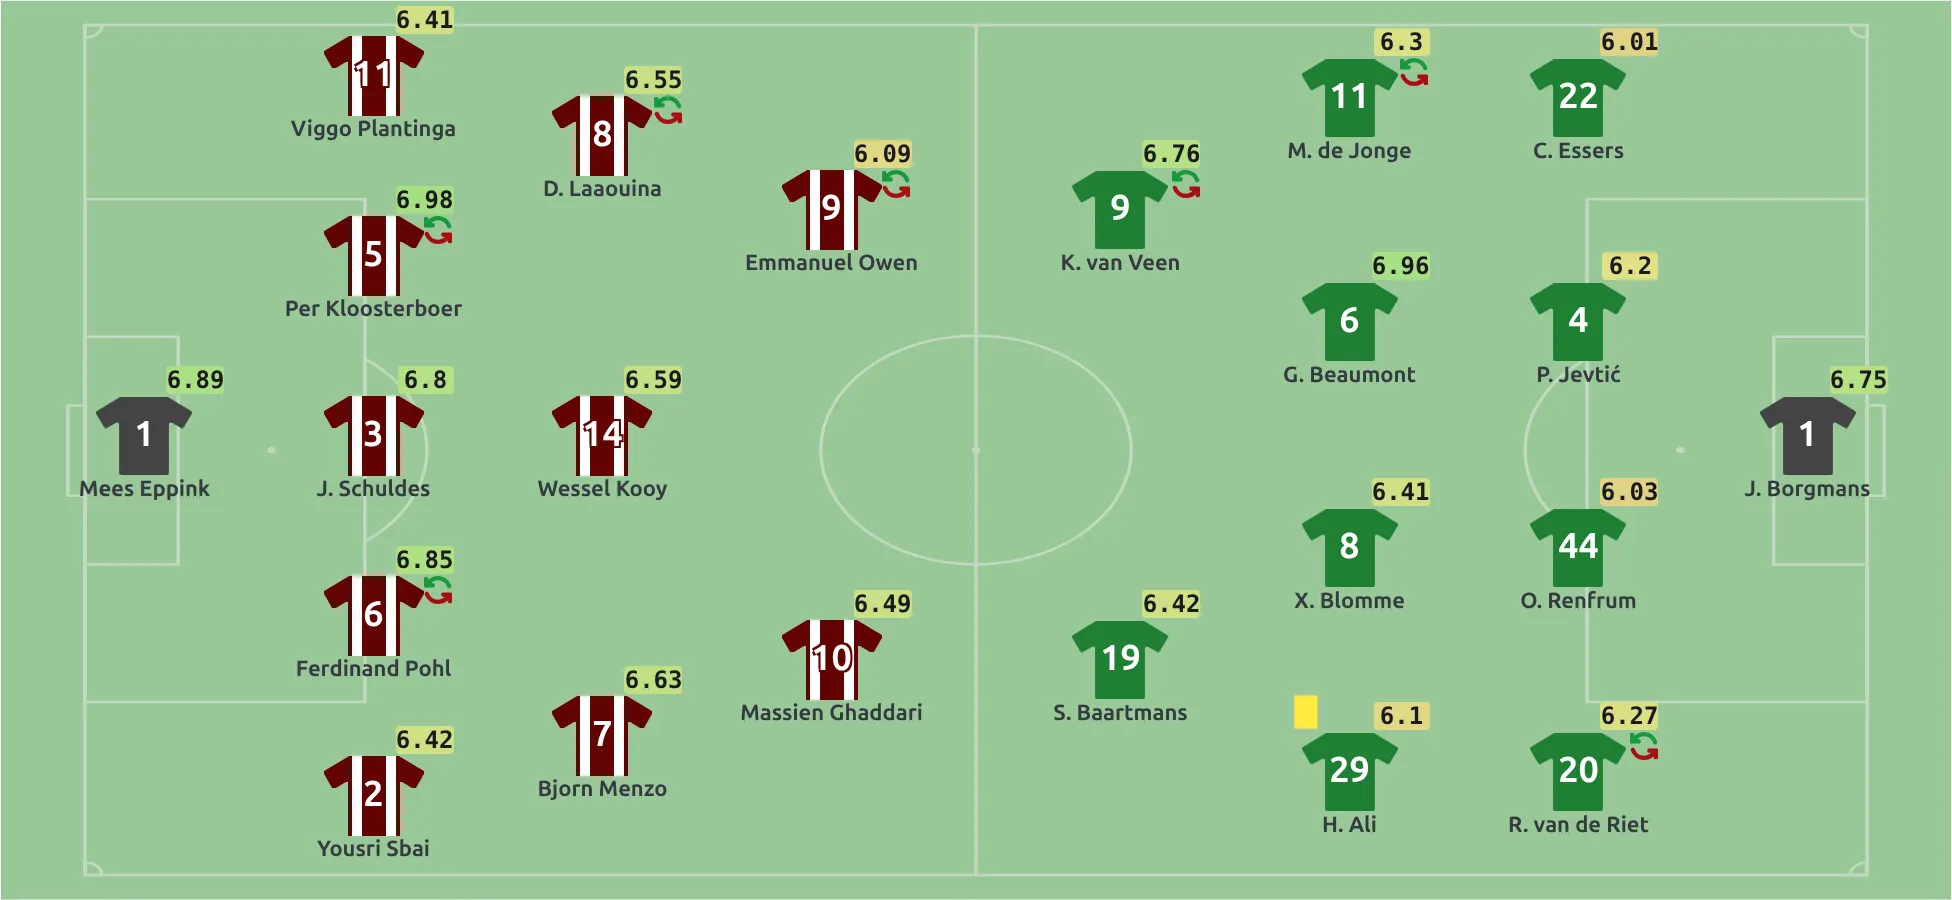
Size and viewBox
The shirt is drawn in a box 50 pixels wide and 40 high. Keep the template’s opening tag as it is – width="50" height="40" viewBox="0 0 50 40" – and draw inside that frame. The viewBox is what lets the shirt scale into the box, so don’t delete it. After saving you’ll see it written as viewbox in lower case – that’s normal, and browsers still read it correctly.
A frame of a different shape doesn’t break anything, but it won’t fill the box. A square drawing, for example, is scaled down to fit the 40-pixel height and comes out noticeably narrower than a normal shirt.
Some SVG features are removed on save
For security, the code is filtered when you press Save. Filled path, rect, circle, ellipse, polygon and g shapes all survive, but a transform is kept only on path, rect and g – a moved or rotated circle, ellipse or polygon jumps back. These are removed completely: <style> blocks and the class-based colors that use them, gradients, masks and clipping, embedded images, the opacity and fill-rule attributes, and anything scripted. A shape that loses its color this way turns white or disappears.
Figma’s default export usually works – just check shapes with holes cut in them, because once fill-rule is removed the hole can get filled in. Draw the hole’s color as a separate shape on top instead. Illustrator’s default doesn’t work – it writes colors into a <style> block. In its SVG export options set Styling to Presentation Attributes. In any editor, convert strokes to filled outlines before exporting (Figma: Outline stroke), because the formation draws shirts with the stroke width set to zero, so a stroke without its own explicit width vanishes.
Goalkeepers never use the SVG
A custom SVG kit is drawn for field players only. The goalkeeper gets the plain shirt icon in dark gray with a white number, whatever the club’s kit is. That is deliberate – a keeper in the outfield kit reads as a mistake. The only way to change it is per game: custom colors in step 2 has its own goalkeeper shirt and number pickers, and colors from API Import uses the keeper colors the provider sent (or the club’s main color when it sent none).
What wins when several are set
Highest first, stopping at the first one that has a value:
- The per-game choice from step 2, when it is anything other than default.
- The club’s SVG kit for the relevant side.
- The club’s solid shirt color for that side. An away side with neither an away SVG nor an away solid color wears the home kit instead.
- The club’s main color.
- The default club colors – blue for the home team, red for the away team. Change them under Settings & Tools > Settings, Club tab: Default Home Club Color and Default Away Club Color.
4. Display options
Go to Settings & Tools > Settings, open the Match Display tab in the Display group, and find the Formations block. These apply to every game.
| Setting | Default | What it does |
|---|---|---|
| Player | Photo & Shirt | Draw each player as a photo over a shirt, a photo alone, or a shirt alone. |
| Player Nationality | Hide | A small flag on each player. |
| Events | Show | Goal, card and substitution icons on the players they belong to. |
| Rating | Show | The rating badge. It needs a stat field chosen – see below. |
| Show link to Player Profile | No | Make each player a link to their own page. |
The rating itself comes from the Lineups block just above it on the same tab: Formation & Lineups Stat Field picks the stat to show, and if you leave it empty it falls back to Player Rating Field. With neither set, the Rating option has nothing to display.
When the block is narrower than 700 pixels – on a phone, in a sidebar, in a half-width column – the field turns vertical and the two teams stack instead of sitting side by side. It follows the width of the block, not the screen, and there’s nothing to configure.
5. Put the block on the page
The formation draws itself on every game page, above the line-ups, once at least one team has players placed on the field.
That changes the moment you build a Game layout. A game layout replaces the default page completely, so any block you didn’t add is gone, this one included. Two ways to put it back:
- In the Layout Builder, add the Formation block from the Match group. The built-in Finished Game layout already puts it at the top of the Line Ups tab – press Load Predefined Layout to start from there.
- With the match shortcode:
[anwpfl-match match_id="123" sections="formation"].
🆘 Troubleshooting
The block does not appear at all
The formation renders nothing when no player has been placed for either club. Open the Formations tab and check the fields are not empty. Saving the game with an empty grid produces the same result as never touching it.
The Available Players row is empty
The Lineups tab has not been filled in for that club. The pool is a live copy of it – fill in the lineups and the players appear straight away.
Squad numbers are missing
The number comes from the club squad for the season, or from a custom number set on the game. A player with neither is drawn with a blank shirt.
Both teams are in the same color
Set the home side’s per-game shirt to away kit for that game, or pick custom colors. To fix it everywhere, give the away club its own away kit on the Club Shirt tab – the away side wears it automatically.
My custom SVG shirt is white, black or partly missing
Part of the drawing relies on something the formation can’t draw – almost always a <style> block from Illustrator, a gradient, or a stroke that was never outlined. Open the club’s Club Shirt tab again after saving and read the code: if the <style> tags have gone (the CSS rules inside them can be left behind as loose text) and your shapes only have class="..." left, re-export with presentation attributes and paste again. See Some SVG features are removed on save above.
My custom shirt is too small or off-center
The drawing’s frame isn’t 50 by 40, or the viewBox was removed from the opening tag. Start again from one of the two templates and draw inside their frame.
Can I upload an image of the shirt instead of SVG code?
No. The Club Shirt tab only takes SVG code. If you have a PNG of the kit, trace it in Figma or Inkscape using the template as the base – flat shirts with stripes or hoops take a few minutes.
Can I give the goalkeeper a different shirt shape?
No. The goalkeeper always uses the plain shirt icon. You can change its color and number color per game with custom colors in step 2.
Can the field be vertical on desktop, or use a different field image?
There’s no setting for either, but the field goes vertical whenever the block is under 700 pixels wide. So on desktop, place the Formation block in a narrow column of your game layout in the Layout Builder. The field drawing itself is built into the plugin and can’t be swapped.
Can player names link to their profile?
Yes. Turn on Show link to Player Profile in the Formations block of the Match Display tab (step 4).
Can a club captain edit the formation from the front end?
No. Front-end game editing covers the general details, events, players and statistics, but not the Formations tab. Formations are built in the admin game editor.
Do imported games get a formation automatically?
Yes, when Import Lineups Formation is on in the API Import settings. The import places each starting player from the provider’s grid positions and, when the provider sends team colors, sets the shirt option to colors from API Import.
Every re-import of that game replaces the formation, so hand edits to an imported formation don’t last. A shirt option you changed by hand can also be switched back to colors from API Import, so check it again after a re-import. If you’d rather build formations and pick kits yourself, turn the formation import off.
📚 Related
- Club squad – where squad numbers come from.
- Layout Builder – where the block goes on the page.
- Import player game statistics – fills the stat used for the rating badge.